Showing posts with label New Horizons. Show all posts

Saturday, March 5, 2022

One Idea - SO MANY CARDS


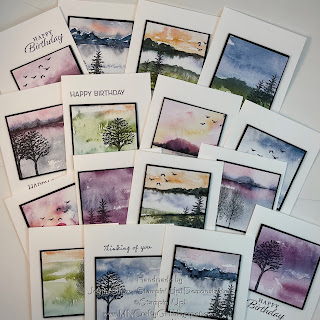
All you need is a great Designer Series Paper - I used the New Horizons 6"x6" paper, Basic White cardstock for the card base, Basic Black cardstock and a greeting stamp set and a tree and bird stamp set

Super Quick design!!!

Cut your DSP into 3"x3" squares
Stamp a tree or trees, birds or a combination of both onto your DSP with Black Memento ink
Cut your Basic Black cardstock into 3 1/4" x 3 1/4" squares
Adhere your DSP to the Black cardstock
Adhere these squares to your white card base
Stamp a greeting above or below the square and you are done!! 

I made 12 quick cards from 3 sheets of the New Horizons DSP in about an hour.
Get all your cutting done first, stamp and assemble and this could
 be a fabulous gift set for someone special in no time!

As a special bonus...If you love this DSP and stamp set that coordinate with it, the Paper Pumpkin kit for March will work together with this bundle.

  March 10th is the last day to order this kit. 
  • This month’s kit contains enough elements to create 9 cards—3 each of 3 designs—and 9 coordinating envelopes. This all-inclusive kit includes printed card bases, die-cut paper pieces, embellishments, adhesive, and more!

Product List

Sunday, January 9, 2022

New Horizons Framed art

Super quick...Super easy!
I found a 6"x6" shadow box style frame at my local craft store and inserted this easy layout inside it for a complete framed piece of art!

I use this frame throughout the year.  I have a different layout design to swap out various times of the year.  Love the flexibility!!!

What do you need?
One sheet of 6"x6" DSP from the New Horizons paper pack, Pebbles Enamel Shapes and Petal Pink ribbon from the ribbon pack from this New Horizons suite, some cardstock and black embossing powder for the word Relax.


Stamp the wood design, die cut it, add dimensionals to the back side.
Add layers of stamped words from the On the Horizon stamp set.  If you don't have embossing powder, you could use a black ink pad and a white ink pad instead.

I layered about 10-12" of the cotton ribbon on the back side of the wood look piece and layered the words with more dimensionals.  That definitely helps make that stand out on the whole design.
White cardstock fences draw your eye to the base of the photo to welcome you into this beautiful scene!
Add a few pebbles to the bottom and your picture is complete!!

Think of trying out this idea with any other DSP that have 
the right look for the artwork you want to create!

Check out some of my other new products from the 
Jan-July Mini Catalog on my FB page: Stampin' With Jenny


Product List