Saturday, March 5, 2022

Happy Birthday to ME!


Ice Cream is one of my most FAVORITE things!  
I plan to celebrate today with a special treat!  
I have a treat for you as well...keep reading...
If it didn't have so many calories, it would be part of my normal diet!!!  I haven't eliminated it from my diet...but I do treat myself every once and a while!

I have found that the Ice Cream punch and the Sweet Ice Cream stamp set can create many different card ideas.  The ice cream cone above used the ice cream cone punch, three different colors of cardstock and an embossing folder to make the ice cream look textured.   Almost makes it look REAL!!  The DSP on this card is from a retired design, but you could use just about any tone-on-tone DSP to recreate this look.

For this card, I used the stamp set to create the ice cream and cone and the punch to cut them out.  The DSP is from a retired design, but did you notice the way I layered the Old Olive cardstock behind the DSP and turned it on an angle on the card base.  Not everything HAS to be squared up!  


Using a scrap of DSP is all you need to add some extra interest to this layout.  The ice cream is punched out of a DSP that looks like marbled ice cream!  Yum!


Moving that strip of DSP to a different area of the card changes up the look of the design.  This is a great way to incorporate your scraps of DSP onto your cards.


By adding a little bit of ribbon on top of your strip of DSP gives you another fun look! One more scrap of DSP has been used under the cone too!


In honor of my Birthday...I want to give YOU a gift!
For any order over $25 that you place this month, 
I will send you a little handmade something from me!!!

Don't forget, you can order any of these items or other items from either catalog or 
the clearance list from my store.  Click HERE to shop today!

Product List

Pretty Poppies


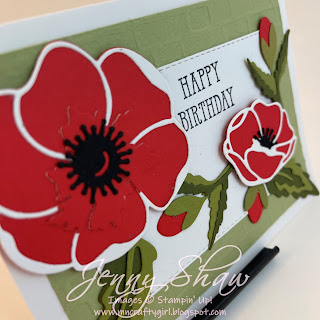
Every once in a while, I just HAVE to create a card that is a bit more detailed and takes a bit more time to create.  But, when it is done, I am so satisfied with my creation I can't wait to send it off to someone special!

This card, created with the Poppy Moments dies is elegant all on its own without using the stamp set that coordinates with it.  I found that using our Adhesive Sheets is really the easiest way to adhere the white outline layer of the flowers.
All you need to do is add an Adhesive Sheet to one side of the White Cardstock.  Keep the adhesive side DOWN on the cutting surface, add the die on top of the cardstock, run it through the machine, peel off the adhesive backing and adhere onto the top of the die cut poppy.


I did use a liquid glue for the leaves and other flowers because there is enough surface to work with.
I actually created both of these cards at the same time because I used 'leftover' pieces on each of them.
The picture above shows a white stitched rectangle sitting on top of an Old Olive Brick and Mortar embossed layer on top of a white card base.
The card below, I used the outside frame left over from the stitched rectangle on the card above to create a window.  I've added dimensionals around the edge of the window to pop it out.  Same flower techniques just different layers for a different look.


Not sure if anyone else does this, but I can never make just ONE card at a time.  I am usually making 2 to 4 cards at once.  I figure if I am already playing with a design or papers, I might as well create a couple, so I don't have as many scraps to put back into my stash.  

How many cards to you create at a time when you are stamping?  Do you send them all out or do you keep one as a base for other ideas the next time you stamp?


Don't forget, you can order any of these items or other items from either catalog or 
the clearance list from my store.  Click HERE to shop today!


Product List

One Idea - SO MANY CARDS


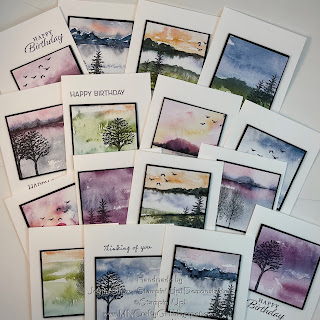
All you need is a great Designer Series Paper - I used the New Horizons 6"x6" paper, Basic White cardstock for the card base, Basic Black cardstock and a greeting stamp set and a tree and bird stamp set

Super Quick design!!!

Cut your DSP into 3"x3" squares
Stamp a tree or trees, birds or a combination of both onto your DSP with Black Memento ink
Cut your Basic Black cardstock into 3 1/4" x 3 1/4" squares
Adhere your DSP to the Black cardstock
Adhere these squares to your white card base
Stamp a greeting above or below the square and you are done!! 

I made 12 quick cards from 3 sheets of the New Horizons DSP in about an hour.
Get all your cutting done first, stamp and assemble and this could
 be a fabulous gift set for someone special in no time!

As a special bonus...If you love this DSP and stamp set that coordinate with it, the Paper Pumpkin kit for March will work together with this bundle.

  March 10th is the last day to order this kit. 
  • This month’s kit contains enough elements to create 9 cards—3 each of 3 designs—and 9 coordinating envelopes. This all-inclusive kit includes printed card bases, die-cut paper pieces, embellishments, adhesive, and more!

Product List
Simple & Elegant


I have found that you don't need a lot of 'things' on a card to make it beautiful.  This design is just a card base, a piece of white cardstock, a strip of DSP and a greeting.  

To make this card I used an edge die - Basic Borders, to cut and trim off one edge of the white cardstock and then glued down a strip of DSP.  I wanted to get the most out of a sheet of 12"x12" DSP so I could create a whole bunch of cards.
The papers in the Flowering Fields DSP allow you to create so many different cards.  For this design, I chose an all over pattern with flowers throughout.  I trimmed it down to 1" x 5 1/2".
With the two pieces glued together, I ran it through an embossing folder to have the image on both pieces matching.  The adhere that to the card base. Lastly, stamp a greeting and punch it using the dual oval punch.  It has been years since we've had a double oval punch and it is so much better that these two layers are both included in the punch!  LOVE IT!!


By using different DSP sheets from this pack, you can create the same card design with multiple looks!  Can't beat the versatility!  And you can make SO many cards by just using a one-inch strip of DSP!
It doesn't hurt to add a bit of ribbon to the card for a little bit of oomph! 


Do you have a favorite?  Is this a card design you could recreate easily?
Let me know what you like about this design.

These products are available now in my store.  Click on any of the items in the links below and it will bring you to my store.

My birthday is this month, and I would like to send you a gift!  If you place $25 order during the month of March, 2022 I will send you a free gift!

When ordering, please use Host Code 2BAUNBPU on your order!


Product List